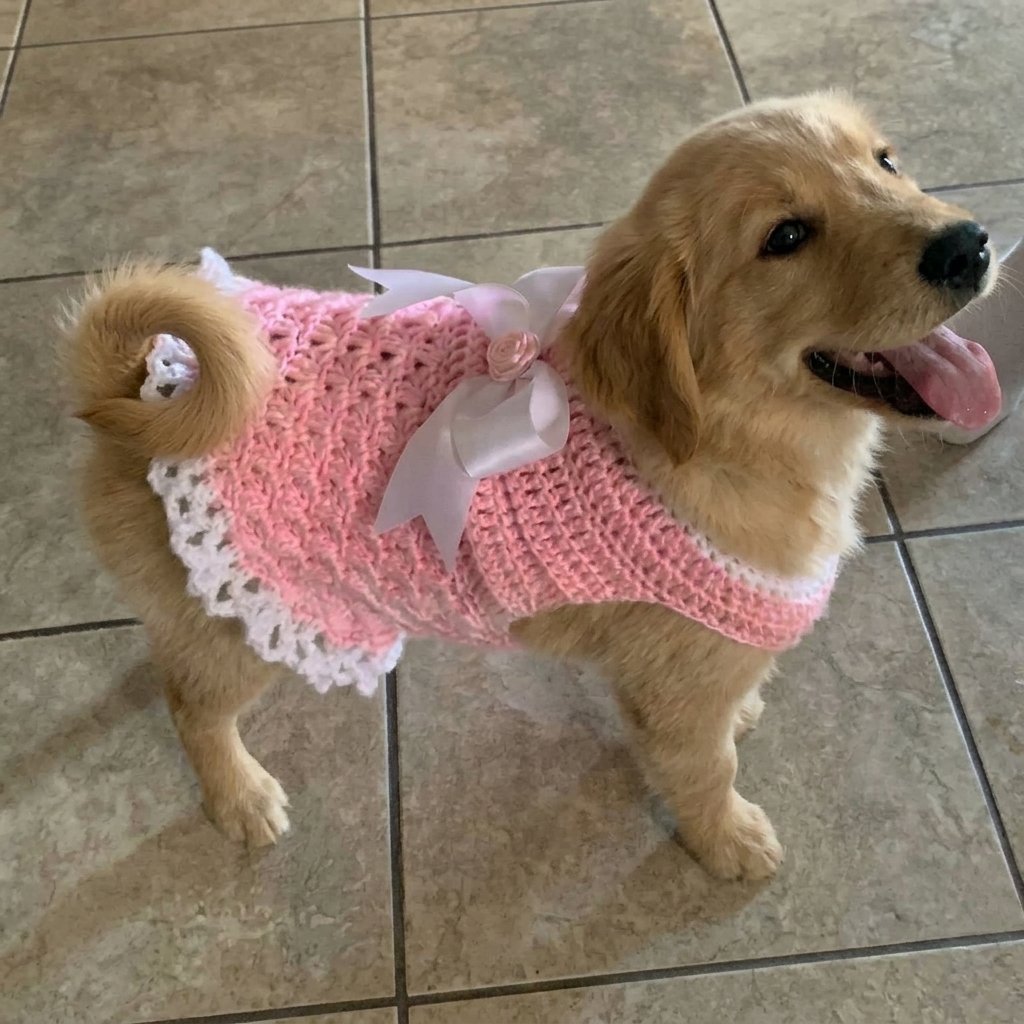
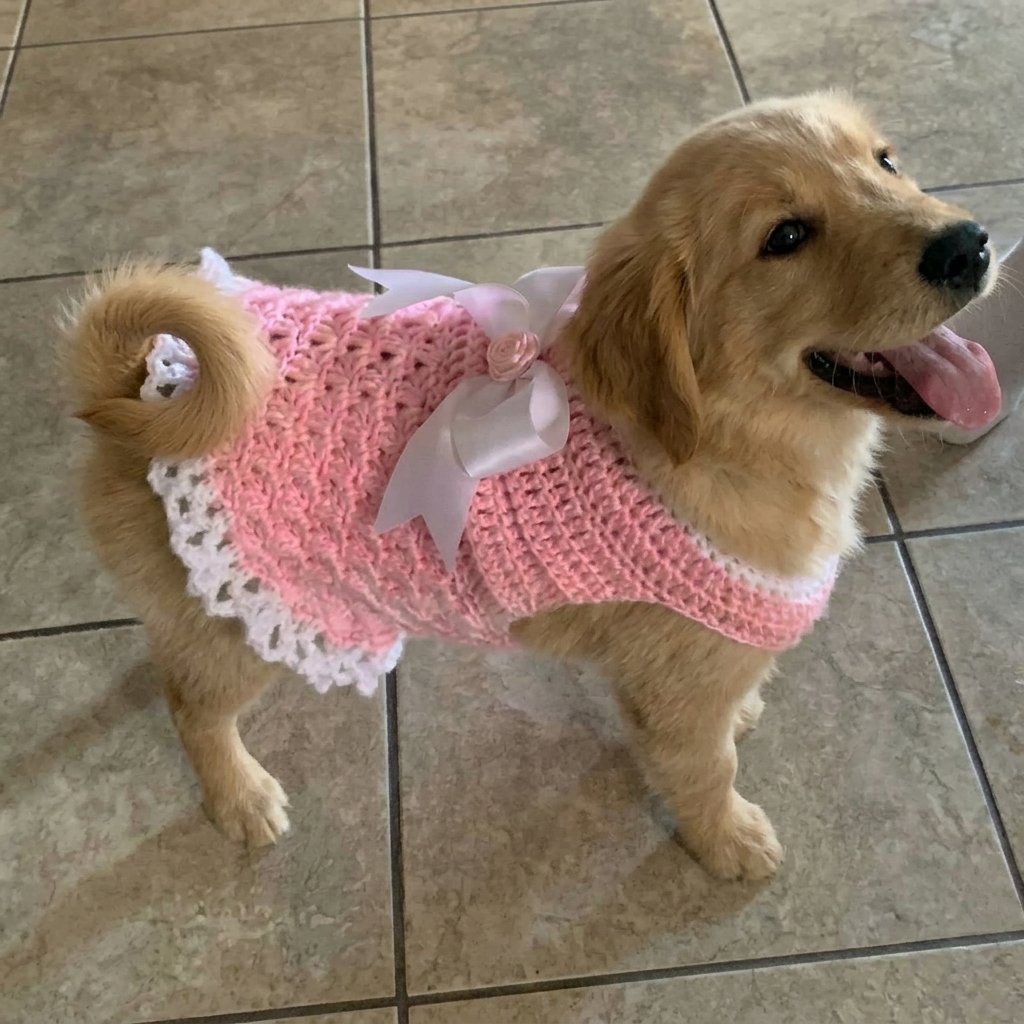
If you are looking for a quick and adorable handmade outfit for your pup, this crochet dog sweater dress is one of the sweetest patterns you will ever make. Designed with a flexible ribbed neckband, comfortable front leg openings, an expanding shell lace skirt, and finished with a charming ribbon bow, it combines warmth and style in a project that works up in just a couple of hours. Below you will find the complete written pattern and step-by-step video tutorial.
Because this pattern is worked from the top down, you can easily customize the sizing to fit your pet perfectly. Whether you have a playful puppy, a jaunty Pug, or a slender Terrier, the stitch counts can be adjusted right from the foundation chain. Grab your hook, choose your favourite yarn colours, and let’s create a cosy wardrobe staple for your furry companion.
Table of Contents
What Will I Learn?
Following this step-by-step tutorial will guide you through several essential pet garment crochet techniques:
- Crocheting an elastic neckband using back-loop-only single crochet (BLO sc) in the round
- Working gradual increase rounds with double crochet to accommodate a dog’s broadening chest
- Dividing stitches into flat back rows to leave roomy, comfortable openings for the front legs
- Bridging the underbelly with a foundation chain to re-form a circular body tube
- Crocheting an airy, flared shell lace stitch in continuous alternating rounds
- Adding a lightweight chain-5 picot ruffle hemline in a contrasting colour
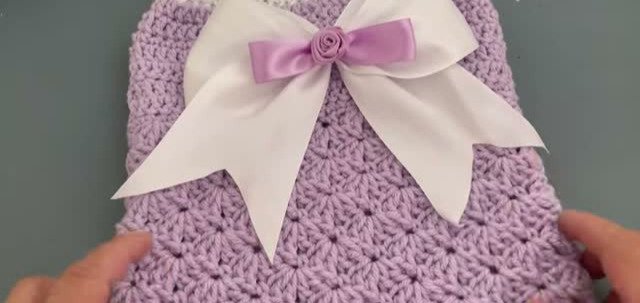
- Crafting a multi-layered satin ribbon bow with a rolled rosette centerpiece
Materials and Tools
Below is everything I used to crochet and assemble this dog sweater dress:
- Yarn: Worsted weight acrylic yarn (#4 medium). In the tutorial, I used:
- Color A (Main Body & Skirt): Approximately 150 to 180 yards of Hobby Lobby “I Love This Yarn” in the shade Orchard (a soft variegated lilac, pink, and green blend).
- Color B (Neckband & Ruffle Hem): Approximately 40 yards of white worsted weight acrylic yarn.
- Crochet Hook: 5.0 mm (US size H-8) crochet hook.
- Notions: Measuring tape, scissors, tapestry / yarn needle, stitch marker.
- Embellishments:
- 26 inches (66 cm) of 3-inch wide white satin ribbon for the main bow.
- 9 inches (22 cm) of 1-inch wide lilac or pink ribbon for the rolled rosette.
- Hot glue gun or sewing needle with matching thread to secure the bow.
Please note on yarn substitution: Any soft, durable worsted weight acrylic or cotton-blend yarn works wonderfully for this pattern. Choose machine-washable yarns so your finished dog dress remains easy to clean after outdoor walks.
Sizing Guide and Measurements
The demonstrated pattern is written for a Small / Medium dog (modeled on a Pug with a broad chest and compact body):
- Neck Circumference: 13 inches (33 cm), with generous stretch to slide over the head.
- Chest / Belly Circumference: 18 to 19 inches (46 to 48 cm) around the widest part of the body.
- Back Length: 11 1/4 inches (28.5 cm) from the top of the neckband to the base of the ruffle.
Customizing the Fit for Any Dog
Because dog proportions vary widely between breeds, you can customize this dress with these simple steps:
- Measure Your Pet’s Neck: Use a soft tape measure around the base of the neck where a collar rests. Add 1 inch for comfortable movement.
- Adjust the Starting Chain: Chain in an even number until your chain matches your pet’s neck measurement without stretching.
- Adjust the Skirt Multiple: When working Round 10 (rejoining the back and underbelly), ensure your total stitch count is a multiple of 6. This allows the 6-stitch shell repeat ([2 dc, ch 1, 2 dc] plus sc) to fit evenly around the skirt.
Pattern Notes and Abbreviations
This pattern is written in standard US crochet terms.
| Abbreviation | Meaning |
|---|---|
| ch | chain |
| sl st | slip stitch |
| sc | single crochet |
| dc | double crochet |
| BLO | back loop only |
| st(s) | stitch(es) |
| sp | space |
| rep | repeat |
Construction Overview:
- Neckband: Begun in white, worked in 2 quick rounds of single crochet (Round 2 in BLO for stretch).
- Chest Yoke: Switched to Color A, worked in rounds of double crochet with evenly spaced increases.
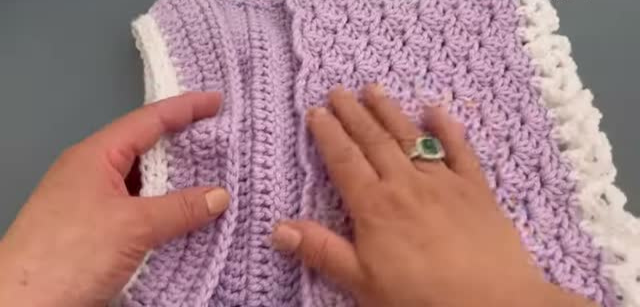
- Leg Openings: Worked flat back-and-forth across the 35 back stitches for 4 rows, leaving the front chest unworked to form the armholes.
- Underbelly Bridge: A 36-chain bridge connects the back panel back into the round to form the underbelly strap.
- Shell Skirt: Worked in the round for 12 rounds of alternating shell clusters.
- Lacy Hem: Switched back to white for airy chain-5 ruffle loops.
- Bow: A layered satin bow and rose are crafted and attached to the back waistline.
Special Stitches
Shell Stitch
Work [2 dc, ch 1, 2 dc] all into the designated single crochet or space. This creates an open, scalloped lace cluster.
Back Loop Only (BLO)
Insert your hook only under the back strand (the loop furthest from you) of the stitch’s top V-shape. This creates an elastic horizontal ridge ideal for collars and cuffs.
The Written Pattern
Part 1: Ribbed Neckband (in White)
Foundation: Using Color B (White) and a 5.0 mm hook, chain 55 (or chain until your un-stretched chain measures 13 inches). Being careful not to twist the chain, join with a slip stitch into the first chain to form a ring.
Round 1: Ch 1 (does not count as a stitch here and throughout). Sc in the same beginning space. Sc into each chain around. Join with a sl st to the first sc. (55 sc)
Round 2: Ch 1. Working in the back loops only (BLO) of each stitch: sc in BLO of each stitch around. On the final slip stitch to the first sc, drop Color B and pull through Color A (Orchard). (55 sc)
Part 2: Upper Body & Increases (in Color A)
Round 3 (Increase Round): Ch 2 (does not count as a stitch). Dc in the first st, dc in the next st, work 2 dc into the next st (increase made). *Dc in each of the next 2 sts, 2 dc in the next st*; repeat from * around, increasing every 3rd stitch. Work 1 dc in the last remaining stitch. Join with a sl st to the first dc. (73 dc)
Round 4: Ch 2. Dc into each stitch around. Join with a sl st to the first dc. (73 dc)
Round 5: Ch 1. Sc into each stitch around. Join with a sl st to the first sc. (73 sc)
Part 3: Front Leg Openings (Flat Rows across Back)
(Now we work in flat back-and-forth rows across the first 35 stitches of the back panel, leaving the remaining stitches unworked to form the side armholes).
Row 6: Ch 2. Dc in the first stitch and in each of the next 34 stitches. Turn, leaving the remaining 38 chest stitches unworked. (35 dc)
Row 7: Ch 2, turn. Dc into each of the 35 stitches across. Turn. (35 dc)
Row 8: Ch 2, turn. Dc into each of the 35 stitches across. Turn. (35 dc)
Row 9: Ch 2, turn. Dc into each of the 35 stitches across. (35 dc)
(The 4 rows of 35 dc establish the back length and provide side openings for the front legs).
Part 4: Rejoining the Underbelly & Skirt Base
Underbelly Chain: At the end of Row 9, chain 36. Being careful not to twist the chain, join with a slip stitch into the top of the first dc on the opposite edge of Row 9.
(This 36-chain bridge closes the underbelly band, leaving two large, comfortable armholes on either side for your pet’s front paws).
Round 10: Ch 1, turn. Work 1 sc into each of the 35 double crochets across the back panel, then work 1 sc into each of the 36 underbelly chains. Join with a sl st to the first sc. (71 to 72 sc; adjust by 1 sc if needed so your total equals 72 sc, which divides evenly by 6 for 12 shell repeats).
Part 5: Flared Shell Lace Skirt
Round 11: Ch 1, sc in the same beginning space. *Skip 2 stitches, work shell [2 dc, ch 1, 2 dc] into the next stitch, skip 2 stitches, sc in the next stitch*; repeat from * around until 2 stitches remain. Skip the last 2 stitches, join with a sl st to the first sc. (12 shells, 12 sc)
Round 12: Ch 3 (counts as first dc), work [1 dc, ch 1, 2 dc] into the same first sc (shell completed over sc). *Sc into the ch-1 space of the next shell, work shell [2 dc, ch 1, 2 dc] into the next sc*; repeat from * around, ending with 1 sc in the final ch-1 space. Join with a sl st to the top of the beginning ch-3. (12 shells)
Round 13: Slip stitch into the next dc and into the center ch-1 space. Ch 1, sc in the ch-1 space. *Work shell [2 dc, ch 1, 2 dc] into the next sc, sc into the ch-1 space of the next shell*; repeat from * around. Join with a sl st to the first sc. (12 shells)
Rounds 14 to 22: Repeat Rounds 12 and 13 consecutively until you have completed 22 rounds in total from the neckband (or until the dress reaches your dog’s tail base). Fasten off Color A.
Part 6: Lacy Chain-Loop Edging (in White)
Round 23: Join Color B (White) with a slip stitch in any stitch along the skirt hem. Ch 1, sc in the same space. *Ch 5, skip 1 stitch, sc in the next stitch*; repeat from * around the entire bottom edge. Join with a sl st to the first sc.
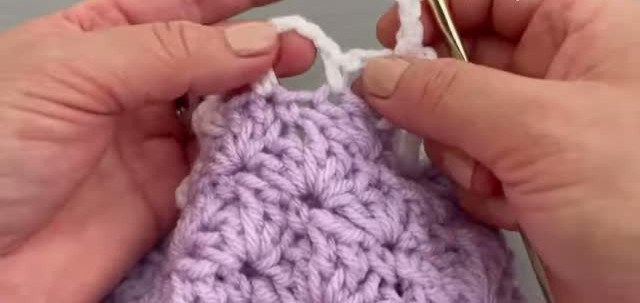
Round 24 (Optional Second Tier): Sl st into the first ch-5 loop. *Ch 5, sc into the next ch-5 loop*; repeat from * around each loop to create a fluttery double ruffle. Join with a sl st to the first loop, fasten off, and weave in all yarn ends.
Part 7: Ribbon Bow & Rosette Accent
- Main Bow: Cut 26 inches (66 cm) of 3-inch wide white satin ribbon. Fold the outer ends inward toward the center to form two loops with descending tails. Pinch the middle accordion-style, wrap tightly with sewing thread, and notch the tail ends into decorative swallowtail V-shapes.
- Accent Ribbon: Cut a smaller 6-inch piece of 1-inch lilac ribbon, fold into small loops, and place across the center of the white bow.
- Rolled Ribbon Rosette: Cut 9 inches (22 cm) of 1-inch ribbon. Fold one corner down diagonally and roll tightly inward between your fingers to create the center rosebud. Continue rolling while folding the ribbon outward and securing with small dabs of hot glue or stitches to form rose petals.
- Assembly: Glue or sew the rosebud onto the center of the layered bow. Position the completed bow on the center back of the dress at the waistline (where the yoke meets the shell skirt) and secure firmly.
Your crochet dog sweater dress is now complete and ready for your pet to model.
Video Tutorial
If you would like to follow along with every stitch, color change, and ribbon bow technique visually, watch the complete video tutorial below:
Tips and Common Mistakes
- Check Neck Stretch First: Always test your foundation ring over your dog’s head before working Round 2. The neck opening should slip easily over the ears without snagging or pulling tightly.
- Accurate Leg Opening Count: Ensure you leave 35 stitches across the back and 36 chains across the belly. This balances the dress so the skirt drapes evenly along the sides without twisting.
- Tension on the Underbelly Chain: Keep your 36 underbelly chains slightly relaxed. If this chain is worked too tightly, the underside of the sweater will bunch up when your pet walks.
- Secure Bow Attachment: If your pet tends to scratch or play with embellishments, hand-sew the ribbon bow firmly using several passes of strong sewing thread through the back stitches rather than using glue alone.
Make More
- Crochet pet sweater dress —-> https://crochetpattern.us/crochet-pet-sweater-dress/
- Crochet basketweave stitch —-> https://crochetpattern.us/crochet-basketweave-stitch/
- Ripple Crochet Pattern —> https://crochetpattern.us/ripple-crochet-pattern/
FAQ
Can this pattern be made without the bow?
Yes! The dress looks charming on its own with the two-tone color block and shell texture. Leaving off the bow makes it a simple everyday sweater dress.
How do I wash a crochet pet dress with a ribbon bow?
If you used hot glue to attach the bow, hand wash the dress gently in cool water with mild soap and lay flat to dry. If you hand-sewed the bow, you can place the dress inside a mesh laundry bag on a gentle cycle.
What if my dog is between sizes?
Crochet fabric naturally has about 1 to 2 inches of positive ease. If your pet’s neck measurement falls between sizes, size down slightly on the hook (e.g. to a 4.5 mm hook) or adjust the starting chain by 2 to 4 stitches.
Can I make the skirt longer for a taller dog?
Yes! You can continue repeating Rounds 12 and 13 of the shell pattern for as many rounds as you like before adding the white chain-loop edging.
I would love to see how your precious furry friends look in their new handmade outfits, so please share your photos and favourite yarn shades in the comments below. Happy crocheting, Meryem.