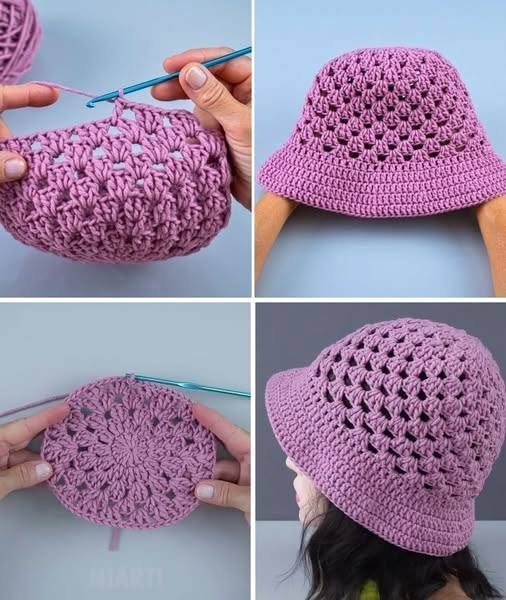
Looking for crochet hat patterns? Make this free adult bucket hat in rounds with clear stitch counts, a 4 mm hook and cotton yarn.
Looking for crochet hat patterns that don’t need any fancy shaping? This one starts as a small ring and grows into a bucket hat, one round at a time. Most of it is double crochet and half double crochet, so if you can do those, you can make it.
This is the standard adult size.
What you’ll need
- Hook: 4 mm
- Yarn: Classic Cotton Big Ball yarn by Loops & Threads. A comparable yarn is Bernat Handicrafter.
- Gauge: 15 sc x 16 rows = 4 in x 4 in (about 10 x 10 cm)
- Tapestry needle for weaving in the ends
- Scissors
- Stitch markers (optional, but useful for tracking rounds)
Gauge tip: Work a small swatch before you start. If your swatch is bigger than 4 in x 4 in, go down a hook size. If it’s smaller, go up one. This changes how well the hat fits.
Abbreviations (US terms)
ch = chain, sl st = slip stitch, dc = double crochet, hdc = half double crochet, FPhdc = front post half double crochet, sp = space, st = stitch
Front post half double crochet: Yarn over, push your hook between the stitches, around the back of the post and out the other side. Yarn over, pull up a loop, yarn over and pull through all 3 loops.
A ch 3 at the start of a round counts as a dc. A ch 2 counts as a hdc. Close every round with a sl st in the top of the starting chain.
Stitch counts at a glance
| Round | Stitches at the end |
|---|---|
| 1 | 12 |
| 2 | 24 |
| 3 | 36 |
| 4 | 42 |
| 5 | 54 |
| 6 onward (repeat rounds) | 54 |
| Hdc round | 72 |
| FPhdc round | 72 |
| Increase round 1 | 96 |
| Plain hdc round | 96 |
| Increase round 2 | 106 |
| Last round | 106 |
Crochet hat patterns: round-by-round instructions
Round 1: Ch 5. Sl st in the first chain to form a ring. Ch 3 (counts as a dc) and work 11 dc into the ring. Join with a sl st in the top of the ch 3. (12 dc)
Round 2: Ch 3 and dc in the same stitch. Ch 1, 2 dc in the next stitch. Repeat around. Join. (24 dc)
Round 3: Sl st in the first stitch, then sl st into the ch-1 space. Ch 3, then 2 dc in the same space. Ch 1, 3 dc in the next ch-1 space. Repeat around. Join. (36 dc)
Round 4 (increase): Sl st in each of the first 2 stitches, then sl st around the ch-1 space. Ch 3 and work 3 more dc in the same space (4 dc counting the ch 3). Ch 1. In the next ch-1 space, work 3 dc, ch 1. In the next space, work 4 dc, ch 1. Keep alternating: 4 dc, then 3 dc, all the way around. Join. (42 dc)
Round 5: Sl st in the first stitch, then sl st into the gap between the 2nd and 3rd dc of the first 4-dc group. There’s no chain space there, but that’s where you work. Ch 3 and 2 dc in the same gap. Ch 1. Work 3 dc in the next ch-1 space, ch 1. Work 3 dc in the next space, ch 1. Then work 3 dc in the gap in the middle of the next 4-dc group. Keep going: 3 dc in every ch-1 space, and 3 dc in the middle of every 4-dc group, with ch 1 between. Join. (54 dc)
Round 6: Sl st in each of the first 2 stitches, then sl st around the ch-1 space. Ch 3, 2 dc in the same space. Ch 1, 3 dc in the next ch-1 space. Repeat around. Join. (54 dc)
Next rounds: Repeat round 6, starting each round the same way (sl st in the first 2 stitches, sl st around the ch-1 space, ch 3, 2 dc in the first space). The video says to do this for seven rounds. Try the hat on as you go, and add or skip a round to get the depth you want.
Hdc rounds
Hdc round: Ch 2 (counts as a hdc). Hdc in the first stitch and the next stitch, then hdc around the ch-1 space. Hdc in each of the next 3 stitches, then hdc around the next ch-1 space. Keep working one hdc in every stitch and around every ch-1 space. Join. (72 stitches)
Front post round: Ch 2 (counts as a hdc). Work a FPhdc around every post. Join. (72 stitches)
Increase round 1: Ch 2. Hdc in the first stitch and in each of the next 2 stitches. Work 2 hdc in the following stitch. Then hdc in each of the next 2 stitches, 2 hdc in the next. Repeat around. Join. (96 stitches)
Plain round: Ch 2 and work 1 hdc in every stitch around. Join. (96 stitches)
Increase round 2: Ch 2 (counts as a stitch). Hdc in each of the next 7 stitches (8 stitches including the ch 2). Work 2 hdc in the next stitch. Then hdc in each of the next 8 stitches, 2 hdc in the next. Repeat around. You’ll end with a short gap of fewer than 8 stitches, and that’s fine: just hdc in each remaining stitch. Join. (106 stitches)
Last round: Ch 2 and work 1 hdc in every stitch. Join.
Finishing
Pull up a little tail and fasten off. Weave the ends in and out of the stitches on the inside to hide and secure them. That’s your hat done.
Tips
- Count at the end of each round using the table above. It’s the easiest way to catch a missed stitch early.
- Round 5 is the tricky one. There’s no chain space in the middle of each 4-dc group, so work between the dc stitches.
- Try it on before you finish the repeat rounds. Head sizes vary, and so does yarn.
- Beginners: if a stitch feels fast, watch the video below.
FAQ
Is this one of the easy crochet hat patterns for beginners?
It uses only chains, slip stitches, dc and hdc, plus one front post round. If you can do those, you can make it.
What size is it?
Standard adult. The creator has a written pattern for child, baby and newborn sizes.
How many stitches does the hat have at the end?
106.
Can I make it deeper or shorter?
Yes. Add or remove repeat rounds (the 54-stitch rounds) before the hdc rounds.
join our free community –> https://www.facebook.com/groups/1813743029589639
Check more patterns —> https://crochetpattern.us