Every holiday season, I find myself craving small, cheerful projects that bring instant warmth to my home without requiring weeks of dedicated crochet time. This colorful tiered crochet Christmas tree has quickly become one of my favorite holiday patterns to whip up between larger afghans and winter garments. With five graduated ruffled tiers stacked in bright festive shades, topped with a crisp little five-point star and finished with a cheerful jingle bell, it makes the sweetest desk decoration, tree ornament, or thoughtful handmade stocking stuffer.
What makes this specific tree design special is how each tier is constructed. Instead of crocheting one solid cone that can feel monotonous or tricky to shape, we crochet five separate circular layers that bloom with dainty scalloped edges worked in the back loops. When stacked and threaded together from top to bottom, the tiers naturally cascade over one another to create full, bouncy evergreen branches. You can make this in traditional forest greens and creams, or let your imagination run wild with candy pastels, retro jewel tones, or festive rainbow colors like I did here.
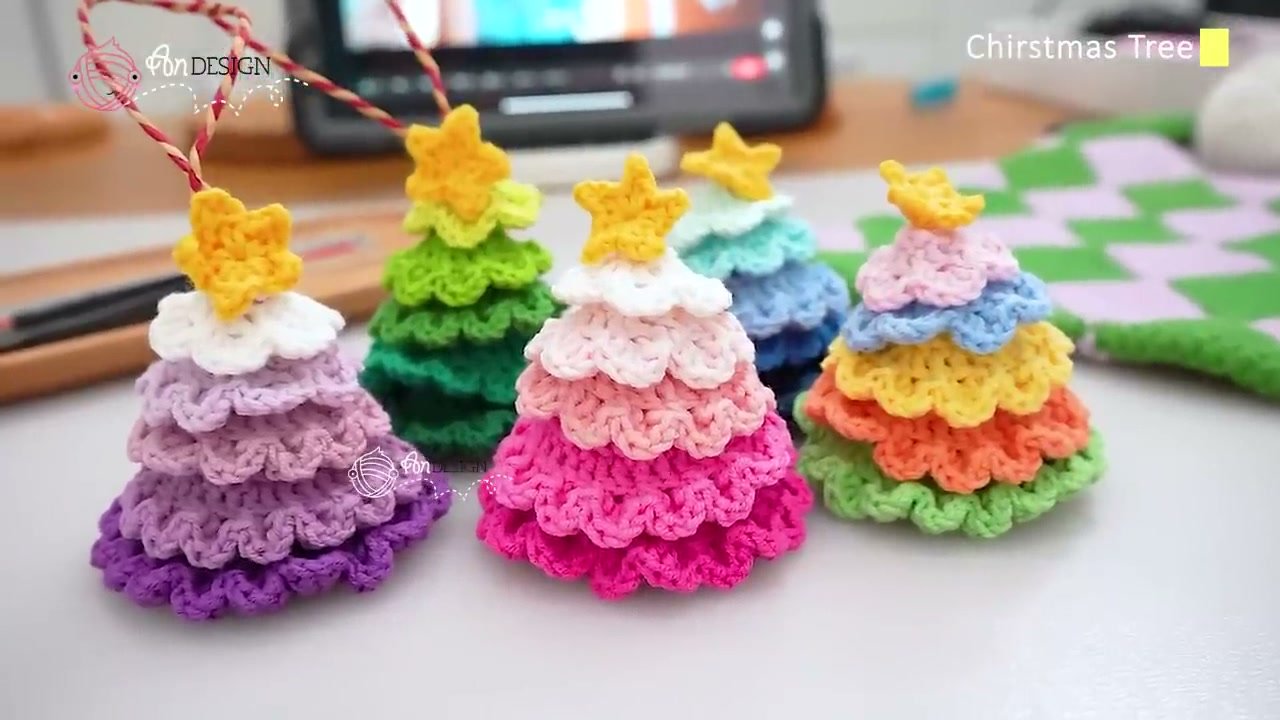
Table of Contents
Materials and Tools You Will Need
Before casting on your first magic ring, gather these supplies. Because this project is worked in small graduated circles, it is an exceptional stash-buster for small leftover balls of yarn.

- Yarn: 4-ply combed cotton yarn (fingering or sport weight) in five coordinating colors for the tiers, plus a small amount of bright yellow or gold for the star topper. Cotton gives fantastic stitch definition and structural stiffness so your tree keeps its perky shape without drooping.
- Crochet Hook: 2.5 mm (US size B-1 or C-2). Using a slightly smaller hook than usual creates neat, tight stitches so the tiers maintain their conical flare.
- Yarn Needle: Blunt-ended tapestry needle for weaving ends and assembling the stack.
- Scissors: Sharp embroidery snips for crisp cuts.
- Jingle Bell (Optional): One small gold or silver craft bell (approx. 10 mm to 15 mm) to sew to the underside of the base.
- Craft Glue or Hot Glue (Optional): A dab between layers if you want an extra-sturdy standing desk tree.
Pattern Notes and Special Techniques
Here are a few essential tips I recommend keeping in mind as you work through the rounds:
- Skill Level: Confident beginner. If you know how to make a magic ring, single crochet, and double crochet, you can easily complete this tree.
- Stacked Single Crochet (Chainless Starting Double Crochet): To avoid the noticeable gap that regular chain-3 or chain-2 turning chains leave in circular motifs, this tutorial uses a stacked single crochet as the first double crochet of each round. Work one single crochet directly into the stitch, then insert your hook under the left vertical bar/top loop of that single crochet and pull up a loop to work a second single crochet directly stacked above it. It mimics the thickness and tension of a real double crochet seamlessly!
- Back Loop Only (BLO) Scallops: The final round of every tier features pretty shell scallops. Working these shells into the back loop only causes the shell ruffle to push outward, creating distinct flared branches.
- Tension Consistency: Keep an even, steady tension across all five pieces. If your tension loosens on later tiers, the bottom layer will become floppy rather than firm.
Stitch Abbreviations (US Terms)
- ch: chain
- sc: single crochet
- dc: double crochet
- dc inc: double crochet increase (2 double crochet stitches in the same stitch)
- sl st: slip stitch
- BLO: back loop only
- MR: magic ring (adjustable loop)
- st(s): stitch(es)
- [ … ]: sequence of stitches to repeat
Part 1: The Top Tier (Smallest)
We begin by crafting the smallest top tier. Choose your first color (I started with a cheerful bright turquoise blue).

Round 1: Foundation Ring
Make a magic ring. In place of a traditional turning chain, work your stacked double crochet into the ring: 1 sc into ring, then insert hook into the top loop of that sc and make 1 sc on top. This counts as your first dc. Work 5 more dc into the magic ring. Gently pull the yarn tail snug to close the center hole. Slip stitch into the top of the first stacked dc to join. (Total: 6 dc)
Round 2: Expanding the Disc
Ch 1 (does not count as a stitch). Work a dc increase in each stitch around: make your first stacked dc in the first stitch, then work a second dc into that very same stitch. Continue placing 2 dc into each remaining stitch around. Slip stitch into the first stitch to close. (Total: 12 dc)

Round 3: Scalloped Shell Edge
Ch 1. Work 1 sc in the first stitch. In the next stitch, working in back loop only (BLO): work [2 dc, ch 1, 2 dc] all into that single stitch to form a shell scallop. Repeat the sequence around: [1 sc in next st, (2 dc, ch 1, 2 dc) in BLO of next st] 6 times total. You will have 6 lovely wavy scallops. Slip stitch into the starting sc to close. Fasten off, leaving a 10-inch yarn tail. Thread the tail with your tapestry needle and bring it neatly to the center back hole of the tier so it is ready for assembly. (Total: 6 scallops)
Part 2: The Second Tier
Pick your second yarn color. We build this tier slightly wider to establish the graduated conical shape.
- Rounds 1 & 2: Repeat the exact pattern from Part 1. You will have 12 dc at the end of Round 2.
- Round 3: Ch 1. [1 dc in next st, dc inc in next st] repeat 6 times around. Slip stitch into the first st to close. (Total: 18 dc)
- Round 4 (Scalloped Edge): Ch 1, 1 sc in first st. In the next stitch (in BLO): work [2 dc, ch 1, 2 dc]. Repeat the sequence [1 sc, (2 dc, ch 1, 2 dc) in BLO] 9 times total around. Slip stitch to the first st to close. Fasten off and weave in ends toward the center underside. (Total: 9 scallops)
Part 3: The Middle Tier
Switch to your third contrast color. This piece sits right in the center of the tree and provides beautiful balance.

- Rounds 1 through 3: Repeat Rounds 1 to 3 from Part 2. You will have 18 dc at the end of Round 3.
- Round 4: Ch 1. [dc inc in next st, 1 dc in each of next 2 sts] repeat 6 times around. Slip stitch into the first st to close. (Total: 24 dc)
- Round 5 (Scalloped Edge): Ch 1, 1 sc in first st. In BLO of next st: [2 dc, ch 1, 2 dc]. Repeat the sequence [1 sc, (2 dc, ch 1, 2 dc) in BLO] 12 times total around. Slip stitch into the first st to close. Fasten off and weave in ends. (Total: 12 scallops)
Part 4: The Fourth Tier
Select your fourth color. We add another six double crochet stitches to the body of the tier to continue the widening cone.
- Rounds 1 through 4: Follow the steps from Part 3 up through Round 4. You will have 24 dc.
- Round 5: Ch 1. [1 dc in each of next 3 sts, dc inc in next st] repeat 6 times around. Slip stitch into the first st to join. (Total: 30 dc)
- Round 6 (Scalloped Edge): Ch 1, 1 sc in first st. In BLO of next st: [2 dc, ch 1, 2 dc]. Repeat the sequence [1 sc, (2 dc, ch 1, 2 dc) in BLO] 15 times total around. Slip stitch to join. Fasten off and weave in ends. (Total: 15 scallops)
Part 5: The Base Tier (Largest)
Grab your fifth color for the grand bottom layer. This wide skirt anchors the entire tree structure.
- Rounds 1 through 5: Follow the instructions from Part 4 up through Round 5. You will have 30 dc.
- Round 6: Ch 1. [1 dc in each of next 2 sts, dc inc in next st, 1 dc in each of next 2 sts] repeat 6 times around. By splitting the single stitches around the increase, the circle remains perfectly round instead of hexagonal. Slip stitch to join. (Total: 36 dc)
- Round 7 (Scalloped Edge): Ch 1, 1 sc in first st. In BLO of next st: [2 dc, ch 1, 2 dc]. Repeat the sequence [1 sc, (2 dc, ch 1, 2 dc) in BLO] 18 times total around. Slip stitch into the first st to close. Fasten off and weave in ends. (Total: 18 scallops)
Crocheting the 5-Point Star Topper
No holiday tree is complete without a jaunty yellow star crowned at the peak. This little star is worked in one simple round into a magic ring.

Star Pattern:
- Make a magic ring using sunny yellow cotton yarn.
- Work the first star point into the ring: 1 sc, ch 1, 1 dc, ch 2, 1 sc into the top loop of the dc (picot point), ch 1.
- Repeat this exact sequence 4 more times into the ring: [1 sc, ch 1, 1 dc, ch 2, 1 sc in top of dc, ch 1]. You will have five distinct star points.
- Gently pull the magic ring tail firmly to close the center hole.
- Slip stitch into the starting single crochet to finish. Fasten off, leaving a 6-inch tail for securing to the tree top.
Assembling and Finishing the Tree
Now that all five colorful ruffled tiers and your star topper are finished, it is time for the magical transformation!
- Stack the Tiers: Arrange your five tiers in order of size, from the largest base (Part 5) on the bottom to the smallest peak (Part 1) on top. Notice how each layer neatly nests inside the one below it.
- Thread the Center Core: Take the long yarn tail left from Part 1. Thread it through your tapestry needle and push it straight down through the center holes of Part 2, Part 3, Part 4, and Part 5.
- Secure the Layers: Pull the yarn gently until the layers sit snugly on top of each other. You want them close together so there are no large gaps, but not squished so tightly that the scallop ruffles lose their puff. Anchor the thread at the base with a couple of discreet stitches. If you like extra firmness, place a small bead of craft glue or hot glue between the center discs before pulling the thread tight.
- Attach the Star: Take the tail of your yellow star topper and sew it firmly onto the top peak of Part 1. Weave in the yarn tail neatly inside the underside of the tree.
- Add the Bell & Hanging Loop (Optional): Sew your small metal jingle bell to the bottom opening of Part 5 using a matching strand of yarn. To hang the tree on your family Christmas tree or garland, thread an 8-inch loop of embroidery thread or metallic gold cord through the top behind the star and knot the ends.
Color Schemes and Display Ideas
One of the joys of this project is playing with color palettes. Here are a few combinations I have made and loved:
- Vintage Festive: Use alternating shades of moss green, burgundy wine, and cream for an antique holiday cottage look.
- Ombré Evergreen: Gradient your tiers from pale mint green at the top down to dark pine forest green at the base.
- Candy Pastel: Soft baby pink, lavender, powder blue, mint, and butter yellow make a whimsical sugarplum tree.
- Nordic Minimalist: Crisp snow white for all five tiers, paired with a metallic silver star and tiny wooden beads nestled along the ruffles.
Frequently Asked Questions
Why does my tree lean to one side after stacking?
If your tree tilts or wobbles, check that the center magic rings are all centered over one another. You can insert a wooden skewer or lollipop stick through the center core while assembling to keep the spine perfectly straight while you secure the layers.
Can I make this tree larger or smaller?
Yes, absolutely! The easiest way to change size without altering the pattern math is to change your yarn and hook. Working this with bulky velvet chenille yarn and a 5.0 mm hook will produce a plush tabletop tree. Using fine lace weight thread with a 1.25 mm hook creates an adorable miniature tree suitable for earrings or dollhouse decor.
Do I need to block the circular tiers before assembling?
Generally, cotton yarn holds its shape so well that blocking is not strictly necessary. However, if your scallops curl slightly upward or fold inwards, giving each tier a light steam with an iron (holding the iron an inch above the piece without touching the yarn) will make the scallops lie flat and defined.
How do I keep the scallop shells perky and defined?
Working the shells in the back loop only (BLO) is the secret key. The unworked front loop creates a slight structural ridge that forces the shell fan to flare outwards horizontally instead of drooping downward.
I hope you enjoy making this sweet little colorful Christmas tree as much as I did. It is such a delightful, peaceful project to crochet beside a cup of hot cocoa on a chilly evening. If you make a set for your home, share your color combinations with me!
Happy crocheting, Meryem