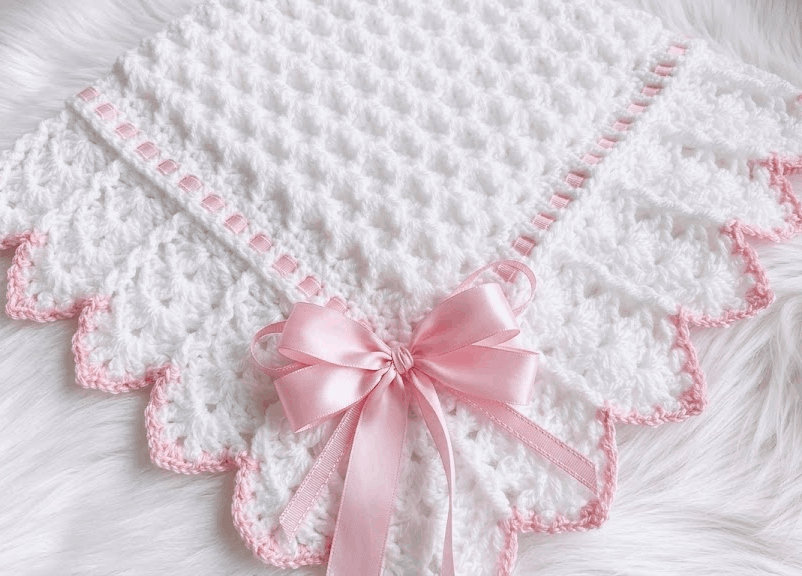
Crochet the Snowdrop baby blanket with this free pattern. Easy stitch repeat, any size, an extended fan border and a woven ribbon.
Some baby blankets look complicated and turn out to be a simple repeat. This snowdrop baby blanket crochet pattern is one of them. After the first two rows, every row is the same, so it’s relaxing to work and easy to pick up again after a break. Then comes the fun part: a fan border in a contrasting color, finished with a ribbon woven through the edge.
This is the extended-border version. The body uses the same snowdrop stitch as the original blanket, and only the border is different. It works for boys and girls, and you can make it any size.
In this post:
- Materials and sizing
- Abbreviations and special stitches
- Blanket body (rows 1-80)
- Border (rows 1-8)
- Ribbon and finishing
- FAQ
Materials
- Main yarn: Stylecraft Special Aran (worsted weight, #4), about 840 g / 1,800 yards in white
- Contrast yarn: about 23 g of lighter DK-weight yarn (#3) in blue for the last border row
- Hooks: 6 mm for the blanket and border, 4 mm for the final contrast row
- Ribbon: 3/8 inch wide, about 2 spools
- Also: yarn needle, stitch markers
Any yarn weight works with any hook size, but your finished size will change. For the contrast row, use a hook one-half to one full size smaller than your main hook (4 mm, or 3.5-4.5 mm).
Size and adjusting
The stitch pattern repeats in multiples of 3 chains. The sample starts with 123 chains, which measure about 37 in (94 cm) unstretched.
- Without the border: about 37 x 40 in
- With the border: about 41.5 x 44.5 in (the border adds roughly 4.5 in)
For a smaller or larger blanket, add or remove chains in multiples of 3. Add or stop rows to change the length.
Abbreviations (US terms)
ch = chain, sl st = slip stitch, sc = single crochet, dc = double crochet, fpsc = front post single crochet, fpdc = front post double crochet, sp = space
Shell: 2 dc, ch 1, sc in the same stitch.
Fan: 3 dc, ch 1, 3 dc in the same stitch or space.
V-stitch: dc, ch 2, dc in the same stitch or space.
Blanket body
Row 1: Ch 123. Sc in the 2nd ch from the hook and in each ch across. (122 sc)
Row 2: Ch 2, turn. Skip 2 sc and work a shell in the 3rd sc. Skip 2, shell in the next sc. Repeat to the last 2 sts, skip 1, sc in the last st. (40 shells)
Row 3 (repeat row): Ch 2, turn.
In the ch-1 sp of the next shell work 2 dc, ch 1, then fpsc around the first dc of the next 2-dc pair. Repeat across. Finish with a sc in the 2nd ch of the turning ch-2. (40 shells)
Rows 4-80: Repeat row 3. Always start with ch 2 and end with a sc in the second chain.
That’s 80 rows total: the sc row, the first shell row, and 78 repeat rows after that. Want a bigger blanket? Keep repeating row 3.
Border
You can add this border to any blanket, as long as opposite sides have the same number of stitches. Start with the right side facing you.
Border row 1: single crochet
Ch 1 and sc in the last stitch. Work sc evenly around the blanket:
- Row ends: if the end stitch is a dc, work 2 sc. For a sc or hdc, work 1. For a ch-2 or ch-3 end, work 2. Aim for flat edges without extra stitches.
- Top edge: over each shell, sc in each of the 2 dc, skip the ch-1 sp, and sc in the fpsc.
- Corners: 3 sc in each corner. Place a stitch marker in the middle sc.
Join with a sl st to the first sc. (119 sc on each side, 120 along the top and bottom, plus 3 sc in each corner = 490 sc)
Border row 2: dc (the ribbon row)
Ch 2. Dc in each sc around, leaving gaps where the ribbon will go later. In each corner, work a V-stitch in the marked stitch. Join with a sl st to the first dc (not the chains). (494 dc)
Border row 3: front post dc
Ch 3 (does not count as a stitch) and turn so you work from the wrong side. Fpdc in each dc. Work a V-stitch in each corner ch-2 sp. Join with a sl st to the first dc, not the chains. (502 dc: 124 along the top and bottom, 123 down each side, plus corners)
Border row 4: fans
Turn without chaining. Starting near a corner, ch 3 (counts as a dc), 2 dc, ch 1, 3 dc in the same dc to make your first fan. Skip 2 dc, fpdc in the next, skip 2, fan in the next. Repeat to the first corner.
At each corner: fpdc in the first dc of the V-stitch, fan in the ch-2 sp, fpdc in the second dc of the V.
If you run out of stitches before a corner, skip 1 dc and work your last fan of that side in the next dc, so the side ends on a fpdc. Join to the beginning with a sl st. (21 fans on each side plus 1 fan in each corner = 88 fans)
Border rows 5-7: growing fans
Each of these rows starts with 3 sl sts (ending in the ch sp of the first fan), then ch 3, 2 dc, ch 1, 3 dc. Work a fan in each fan and a fpdc between fans. Only the corner fans change:
| Row | Corner fan |
|---|---|
| 5 | 4 dc, ch 2, 4 dc |
| 6 | 5 dc, ch 2, 5 dc |
| 7 | 6 dc, ch 2, 6 dc |
Join with a sl st each round. Keep the fpdc loose and level with the fans. Want a wider border? Add more rows and increase each corner by one dc per side. Finish row 7 with a sl st, cut the yarn and pull it through.
Border row 8: contrast edging (optional)
Switch to the lighter blue yarn and a 4 mm hook. Join next to the last fpdc, then ch 3. Sl st between the first two dc of the first fan (between stitches, not on top). Ch 3, sl st between the next two dc. Ch 3, then sc, ch 3, sc in the ch-1 sp at the center of the fan. Ch 3, sl st between the next two dc, ch 3, sl st between the next two. Ch 3, sl st on each side of the fpdc. Repeat around.
In the corner fans, skip 2 dc at a time for each slip stitch, and work the sc, ch 3, sc in the ch-2 center. Join with a sl st, cut the yarn and pull it through.
Ribbon and finishing
- Cut 4 pieces of ribbon, one for each side. Each piece should equal the side’s length plus about 24 in, so you have 12 in at each end for the bow.
- With a yarn needle, weave each piece in and out of border row 2 (the dc row), starting at a corner.
- Pull the ribbon through until it is centered, then smooth it into place as you go. It takes patience.
- Tie a small bow at the center of each side.
- Weave in all ends.
Tips
- Check stitch counts at the end of each border row, so each side matches before you move on.
- Start the border on the right side, or the border will face the wrong way.
- Keep front post stitches loose for the fan rows so the edge lies flat.
- Block the blanket lightly if the border ruffles.
FAQ
What yarn works best for the snowdrop baby blanket crochet pattern?
Stylecraft Special Aran was used here, but any yarn works. The size will change, so adjust your chain count in multiples of 3.
How much yarn do I need?
About 840 g (1,800 yards) of main color and about 23 g of contrast yarn for the final border row.
Can I make it bigger?
Yes. Add chains in multiples of 3 and work more rows of the repeat row.
Do I have to use the blue border row or ribbon?
No. Both are optional. The blanket is finished after border row 7.
Is it beginner friendly?
It uses basic stitches (sc, dc, front post stitches), and the pattern repeats. The border takes the most care.
https://www.facebook.com/profile.php?id=61592761921213
Check more patterns —> https://crochetpattern.us