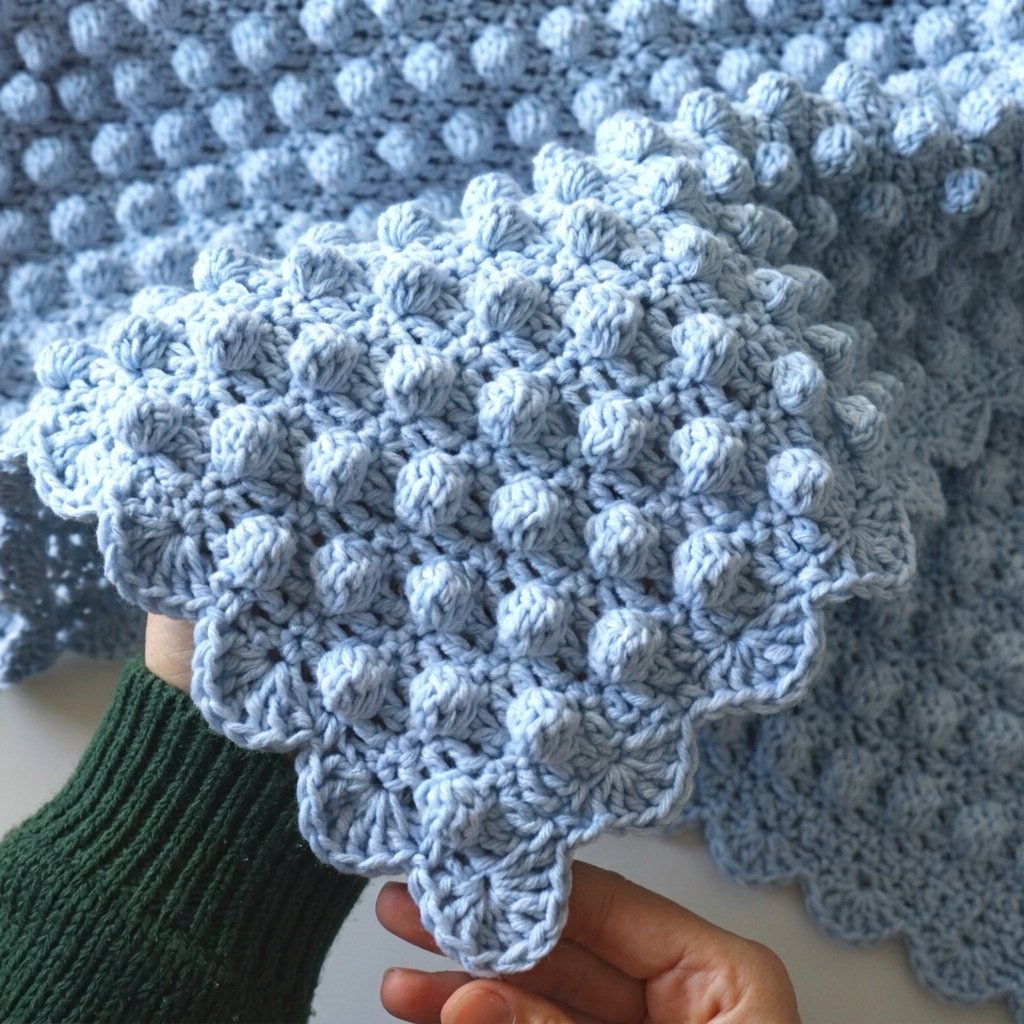
Crochet a squishy bubble blanket with this free pattern. A simple 4-row repeat, newborn size (about 70 cm) and an easy shell border.
When I picked up my hook for this project, I was still pretty green at crochet. Honestly, staring down the pattern had me a bit intimidated at first, but once I got going, it was surprisingly smooth sailing. It took me about a week of working here and there to finish this blanket for my daughter, and seeing the finished piece was such a high—it was the first time a project made me realize, “Hey, I can actually make real, beautiful things.”
If you’ve never worked a bubble stitch before, take a deep breath. You only need three basic stitches here: single crochet, double crochet, and the bubble itself. If you can handle the first two, the bubble is a breeze, and I’ll walk you through every step.
This sample wraps up at a cozy newborn size, about 70 cm (27 in) long. Need something larger? Sizing up is as simple as adding extra starting chains; I’ll explain how below.
What You’ll Need
Hook: 5 mm
Yarn: Soft, medium-weight yarn.
- it’s a good idea to grab an extra skein just in case, especially if you plan on sizing up.
Notions: Yarn needle for weaving in those loose ends
Abbreviations (US Terms)
- ch: chain
- sl st: slip stitch
- sc: single crochet
- dc: double crochet
- tr: treble (triple) crochet
- st(s): stitch(es)
How to Work the Bubble Stitch
Yarn over, insert your hook into the stitch, yarn over again, and pull up a loop. Yarn over and draw through 2 loops (you’re left with 2 loops on your hook). Repeat that exact process 4 more times in the exact same stitch. You’ll end up with 5 unfinished double crochets and 6 loops sitting on your hook. Yarn over one last time and pull through all 6 loops. Following it up with a single crochet in the next stitch locks the pop of the bubble right into place.
Quick note: Your hands might feel a little awkward on the first couple of attempts. That’s totally normal! Give it until your third or fourth bubble, and your muscle memory will take over.
Sizing & Starting Chain
Work your starting chain in multiples of 4, plus 3.
The newborn sample starts with 103 chains, giving you 101 stitches on every single row. To make a wider blanket, just keep adding chains in groups of four.
The Pattern
Row 1: Ch 103. Skip the first 3 chains (these count as your first dc), then dc into the 4th chain from your hook. Dc across the rest of the chain. You should have 101 dc.
Row 2 (Bubble Row A): Ch 1 and turn. Sc in each of the first 2 sts. Bubble in the next st, sc in each of the next 3 sts. Repeat from * to * 24 times total, until 3 sts remain. Bubble in the next st, then sc in the last 2 sts.
Row 3: Ch 3 (counts as a dc) and turn. Skip the first st, then dc in every stitch across, making sure to stitch into the top of every bubble. (101 dc)
Row 4 (Bubble Row B): Ch 1 and turn. Sc in each of the first 4 sts. Bubble in the next st, sc in each of the next 3 sts. Repeat from * to * 23 times total. Finish with a bubble in the next st, then sc in each of the remaining 4 sts.
Rows 5 onward: Simply repeat Rows 2 through 4 (dc row, Bubble Row A, dc row, Bubble Row B) until your work hits 70 cm, or whatever length feels right to you.
Keeping things aligned:
Row A carries 25 bubbles with 2 sc at each edge. Row B carries 24 bubbles with 4 sc at each edge. That slight offset creates the staggered grid of bubbles. Keep an eye on your stitch counts! If you drop a stitch, the whole pattern shifts sideways. The easiest spot to miss a stitch is right next to a bubble on the dc rows. Just gently nudge the bubble out of the way to make sure you’re working into it.
The Border
We’re wrapping the blanket in a frame of delicate shells made from double and treble crochets. It’s easily the most detailed part of the project, but don’t overthink it. Dive in and take it step by step.
Standard Shell (7 sts total): Work (2 dc, 3 tr, 2 dc) all into the same stitch.
Corner Shell (9 sts total): Work (3 dc, 3 tr, 3 dc) all into the same stitch. (Note: At the very start of the border, your initial ch-3 counts as the first dc.)
Starting Corner: Begin right in a corner stitch by working: ch 3, 2 dc, 3 tr, and 3 dc all into that same space.
Along the Sides: You’ll only be working into the raw edges of the bubble rows, skipping the ends of the dc rows entirely. Sc in a bubble-row end, skip the dc-row end, shell into the next bubble-row end, skip the next dc-row end… keep alternating sc and shell all the way down.
Top and Bottom Edges: Skip 2 sts, sc in the 3rd st, skip 2 sts, shell in the 3rd st. Repeat this rhythm until you reach the next corner.
Corners: Work a full Corner Shell into each of the remaining three corners.
Finishing up: If your stitch counts don’t divide perfectly at the ends, simply skip 1 stitch instead of 2 right before the corner to land where you need to be. Fasten off, join invisibly to the start of the border, and weave in your ends.
Helpful Tips
Keep a relaxed tension: Keep those bubble loops on the looser side. If you feel like you’re wrestling your hook through those 6 loops, your tension is too tight.
Use markers: Clipping a stitch marker into the first stitch of a row helps tremendously when you’re getting used to turning chains.
Don’t fear frogging: If something looks wonky, pulling back a row is no big deal. We’ve all been there!
Note: The original video tutorial demonstrates a chunkier bubble variation, but because the caption details were sparse, I stuck with this classic standard bubble to keep things foolproof.
Frequently Asked Questions
How big is this crochet bubble blanket?
Starting with 103 chains gives you a newborn blanket about 70 cm (27 in) long. You can scale up by adding 4 chains per extra repeat.
How many stitches should I have per row?
The newborn size maintains 101 stitches per row throughout.
Is this pattern beginner-friendly?
Definitely. As a beginner myself, I finished it in a week. The treble stitches in the border take a little extra focus, but it’s completely manageable if you take your time.
What yarn works best?
Stick with a soft, medium-weight yarn paired with a 5 mm hook. The original video uses an acrylic-and-wool blend.
join our free community –> https://www.facebook.com/groups/1813743029589639
Check more patterns —> https://crochetpattern.us