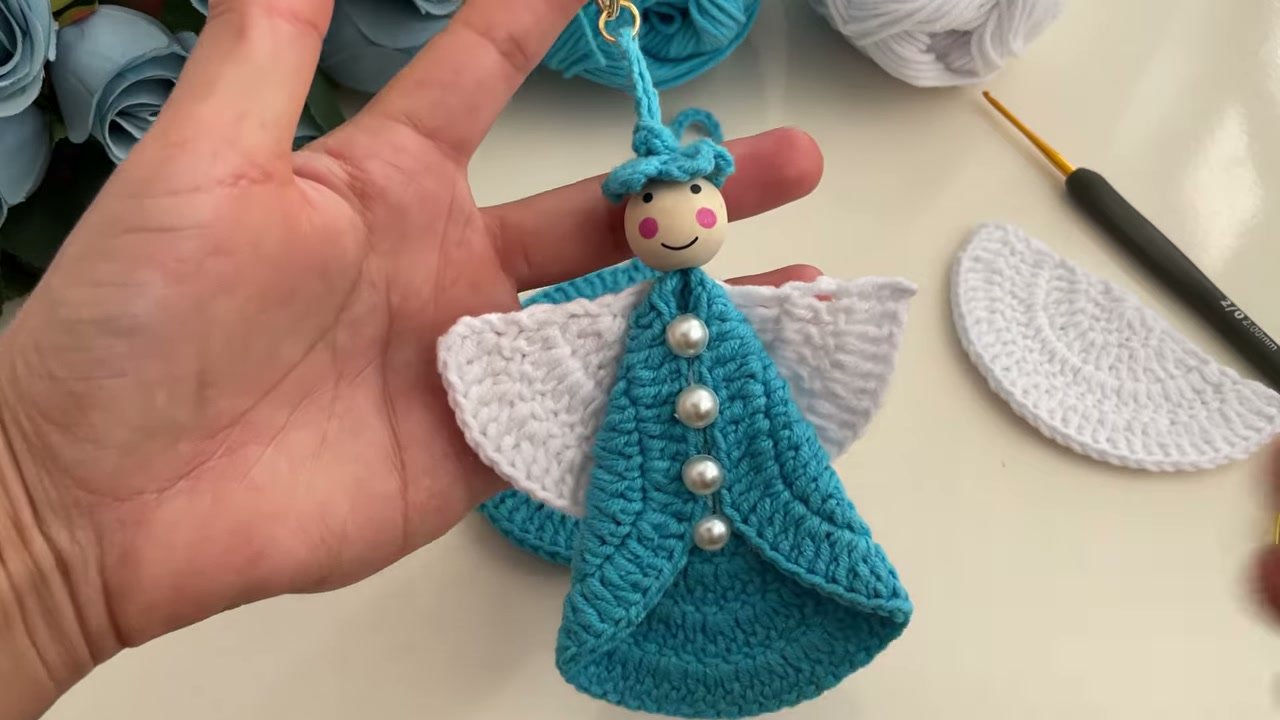
If you are looking for a quick and charming weekend craft, this crochet angel keychain is one of the sweetest small makes you can create. With just a flat circular crochet motif, a simple pair of wings, and a cute painted wooden bead, you can turn basic stitches into an angelic charm for your keys, bag, or Christmas tree. Although three-dimensional projects can sometimes feel intimidating, this pattern is completely beginner friendly because you work flat pieces and fold them into shape.
In this post, you will find both the comprehensive written pattern with clear stitch counts and the step-by-step video tutorial to guide you along. Whether you want to make thoughtful handmade gifts for friends, craft stocking stuffers for the holidays, or sell charming little charms at craft fairs, this tutorial contains everything you need to finish your own angel in under an hour.
This post is based on the video tutorial by knitting corner, linked below.
Table of Contents
- What Will I Learn?
- Materials and Tools
- Finished Size
- Pattern Notes and Abbreviations
- The Written Pattern
- Assembling the Angel
- Video Tutorial
- Tips and Common Mistakes
- Make More / Related Patterns
- Frequently Asked Questions
What Will I Learn?
This project is ideal for practicing basic circular crochet and simple motif shaping. You will learn several fundamental techniques that carry over to many other decorative crochet projects:
- How to start and work evenly into a magic ring.
- How to increase double crochet rounds consistently so your circle stays completely flat without cupping.
- How to work in turned rows to form a clean semicircle for angel wings.
- How to crochet a continuous hanging loop directly onto your motif.
- How to create a tiny five-petal flower hat or halo using simple chains and slip stitches.
- How to assemble flat motifs into a conical three-dimensional figure using a bead and craft glue.
Materials and Tools
You only need small scraps of yarn and a few basic craft accessories to bring this angel to life. Below is the list of materials I used for this project:

- Yarn: Sport weight or fine DK cotton yarn in two colors: bright blue or turquoise for the gown and hat, and white for the angel wings. Cotton yarn gives crisp stitch definition and holds its shape nicely.
- Crochet Hook: 2.0 mm crochet hook (size 2/0). Using a small hook ensures tight, neat stitches so the fabric keeps its form when folded.
- Wooden Bead: One round wooden craft bead (approximately 18 mm to 20 mm in diameter) with a pre-painted smiley face, pink cheeks, and a large center hole.
- Embellishments: Four small half-pearl craft beads (about 6 mm to 8 mm) to decorate the front of the gown.
- Keychain Hardware: One gold-tone keychain split ring with a short attached link chain and jump ring.
- Tools: Sharp embroidery scissors, yarn needle for weaving in tails, and a hot glue gun with glue sticks (or a strong clear craft fabric glue).
If you wish to substitute yarn, a light DK cotton or cotton-blend yarn works wonderfully, however please avoid very fluffy yarns because the stitch detail and clean folded edges can get lost.
Finished Size
When worked with the recommended sport weight cotton yarn and a 2.0 mm hook, the finished crochet angel measures approximately 3.5 inches (9 cm) tall from the top of the hat to the hem of the gown, with a wingspan of about 3 inches (7.5 cm). The attached hanging chain loop adds about 1.5 inches to the overall height.
Pattern Notes and Abbreviations
Please note that this pattern is written using standard US crochet terms. The stitch abbreviations used throughout the instructions are listed below:
- ch: chain
- dc: double crochet
- sl st: slip stitch
- st(s): stitch(es)
- mr: magic ring
The angel body is worked in joined rounds starting from the center outward. At the beginning of each double crochet round, the starting chain-3 counts as the first double crochet stitch. The wings are worked in rows back and forth to create a neat semicircle. Keep your tension firm and steady throughout to ensure the pieces fold smoothly without warping.
The Written Pattern
The pattern is made in three separate crochet components: the circular gown motif with its built-in loop, the semicircle wings, and the tiny five-petal flower hat.
Part 1: The Gown Motif (Blue Yarn)
The main body of the angel is worked as a flat crochet circle using your chosen dress color.

Round 1: Begin by forming a magic ring. Chain 3 (counts as your first double crochet), then work 13 double crochets into the ring. Pull the yarn tail snugly to close the center hole. Join with a slip stitch into the top of the beginning chain-3. (14 dc)

Round 2: Chain 3 (counts as your first dc), work 1 dc into the very same base stitch. Work 2 dc into each remaining stitch around the circle. Join with a slip stitch into the top of the beginning chain-3. (28 dc)
Round 3: Chain 3 (counts as your first dc), work 2 dc into the next stitch. Repeat the pattern of [1 dc in the next stitch, 2 dc in the following stitch] all the way around the circle, for a total of 14 pattern repeats. Join with a slip stitch into the top of the beginning chain-3. (42 dc)

Hanging Loop: Do not fasten off yet. Chain 35 to create a long hanging loop. Join with a slip stitch back into the same stitch at the base of the chain. Fasten off your yarn, leaving a short tail. Use your yarn needle to weave in all yarn ends securely on the back of the motif.
Part 2: The Wings Motif (White Yarn)
The angel wings are worked in turned rows to form a crisp half-circle.

Row 1: Using white yarn, start with a magic ring. Chain 3 (counts as first dc), then work 7 dc into the ring. Gently pull the yarn tail to close the ring into a semicircle shape, leaving the straight edge flat. Turn your work. (8 dc)
Row 2: Chain 3 (counts as first dc), work 1 dc into the first stitch. Work 2 dc into each remaining stitch across the row. Turn your work. (16 dc)
Row 3: Chain 3 (counts as first dc), work 2 dc into the next stitch. Repeat the sequence of [1 dc in the next stitch, 2 dc in the following stitch] across to the end of the row. Fasten off your yarn and weave in the ends neatly. (24 dc)
Part 3: The Flower Hat / Halo (Blue Yarn)
This sweet little accent sits right on top of the wooden head bead, functioning as both a decorative bonnet and a halo.
Petals: Using blue yarn, make a magic ring (or chain 4 and join with a slip stitch to form a small ring). Work the petal sequence: [chain 3, 1 double crochet into the ring, chain 3, slip stitch into the ring]. Repeat this sequence four more times for a total of 5 petals. Fasten off and weave in the ends, making sure the center opening remains clear so your chain loop can pass through.
Assembling the Angel
Once your three crochet motifs are ready, assembling the angel takes only a few minutes. Follow these simple steps in order:

- Thread the Loop Through the Bead: Lay the blue gown circle flat. Insert your crochet hook down through the center hole of the painted wooden bead from top to bottom. Catch the 35-chain loop with the hook and pull it all the way up through the bead, so the bead rests snugly at the top edge of the crochet circle.
- Add the Flower Hat: Insert your crochet hook from the top down through the center hole of the blue 5-petal flower hat. Catch the chain loop and pull it through the hat until the hat sits directly on top of the wooden bead.
- Fold the Gown: With the hanging loop emerging from the top, fold the left side of the blue circle toward the center at an angle. Fold the right side over to meet it at the center line, creating a clean cone-shaped gown with a flared bottom hem.
- Secure the Gown with Glue: Lift the overlapping front edges slightly and apply a thin line of hot glue along the inside seam. Press the folds firmly together until the glue sets.
- Attach the Wings: Turn the angel over so the back of the gown is facing you. Place the white semicircle motif against the back of the gown, positioned just beneath the wooden head bead with the curved edge pointed outward. Apply a small amount of hot glue between the gown and the wings, then press gently to bond them.
- Decorate with Pearls: Turn the angel back to the front. Place four small dots of hot glue down the center front seam of the blue gown, spaced evenly from the neck down to mid-skirt. Press a pearl bead onto each dot.
- Attach the Keychain: Open the jump ring on your gold keychain hardware using small pliers. Slide the jump ring through the top of the 35-chain crochet loop, then close the ring securely.
Video Tutorial
If you prefer watching each step in action, you can follow along with the complete step-by-step video below:
Tips and Common Mistakes
- Keep your stitches tight: When making the circle motif, loose stitches can cause the fabric to feel floppy. A tight tension gives the gown structural stiffness so it holds its conical shape.
- Do not pull the magic ring too tight on the hat: Make sure the center hole of the 5-petal hat is wide enough to let the 35-chain loop pass through easily without snagging your stitches.
- Test the fold before gluing: Before adding hot glue to the gown, fold the edges and check that the skirt looks balanced and symmetrical. Adjust the angle until both front flaps line up neatly.
- Use glue sparingly: Hot glue sets fast and holds securely on yarn, but too much glue can seep through the stitches and become visible. A thin bead of glue is all you need.
Make More / Related Patterns
If you enjoyed crafting this angel, here are three other charming small projects you might love making next:
- Crochet Beanie Pattern : https://cozyknotty.com/crochet-beanie-pattern/
- Crochet Cardigan Pattern : https://cozyknotty.com/crochet-cardigan-pattern/
- Crochet daisy granny square : https://cozyknotty.com/daisy-granny-square/
Frequently Asked Questions
What kind of yarn is best for this angel keychain?
I recommend using a sport weight or fine DK cotton yarn. Cotton provides excellent stitch definition, does not pill, and provides enough stiffness for the folded gown to maintain its shape over time.
Can I make this project without hot glue?
Yes, you can. Although hot glue is the quickest method, you can easily use a yarn needle and matching thread to hand-stitch the front seam of the gown and sew the wings and pearl beads in place.
What size wooden bead should I buy?
A wooden bead with a diameter between 18 mm and 20 mm is the ideal proportion for this project. Ensure the bead has a hole that is at least 3 mm to 4 mm wide so your crochet hook and chain loop can pass through smoothly.
Can I hang this on a Christmas tree instead of using it as a keychain?
Definitely! You can simply skip attaching the metal keychain hardware. The 35-chain crochet loop already serves as a sturdy hanging loop that slips directly over tree branches or ornament hooks.
I would love to see your finished angel keychains, so please share your photos and questions in the comments below. Happy crocheting, Meryem!
One thought on “Crochet Angel Keychain Pattern: Easy Motif Tutorial”