Make a chunky daisy blanket with this beginner granny square crochet pattern: bulky yarn, five easy rounds, 42 squares, and full border steps.
Daisy Granny Square Crochet Pattern: A Chunky Blanket for Beginners
What if you only had to learn one thing to make a whole blanket? That’s the appeal of this granny square crochet pattern. Every square uses the same five rounds, so once your hands know the daisy, you know the blanket. Bulky yarn and a big hook keep things moving, and each square works up in about the time it takes to watch an episode of something.
The finished look is white daisies with mustard centers on a muted green background. It’s a little retro and very cozy.
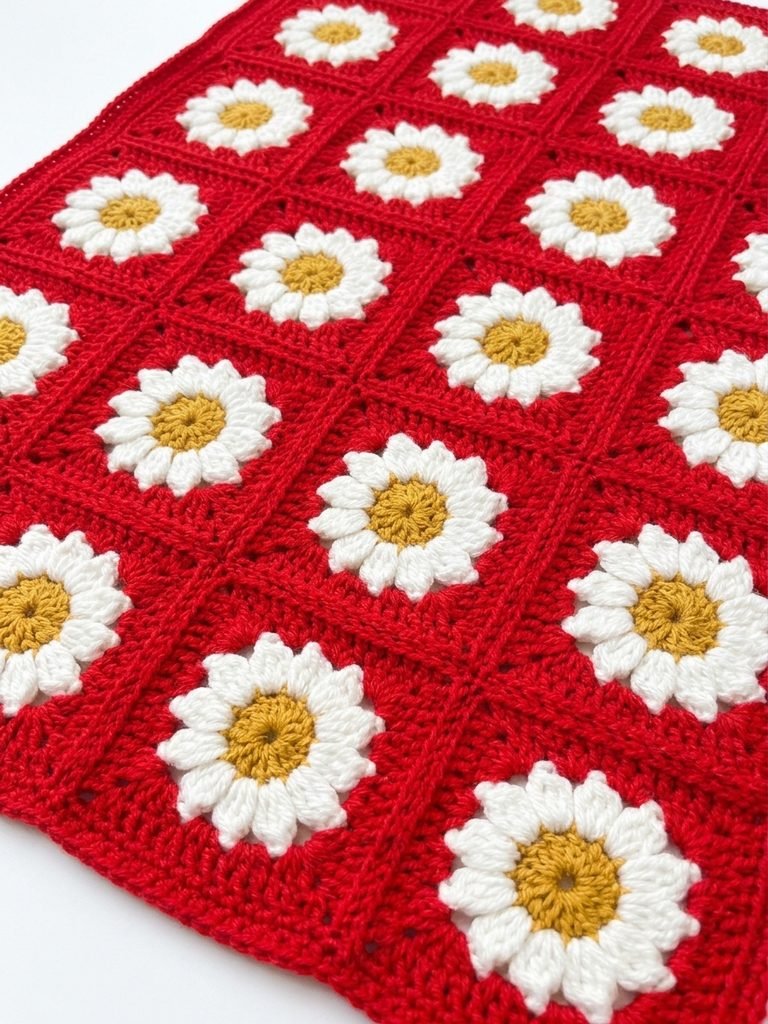
I made mine over about two weeks of evenings. It came out heavier than I expected, almost squishy, and now it lives on the couch, where the dog has claimed one end.
What You’ll Make
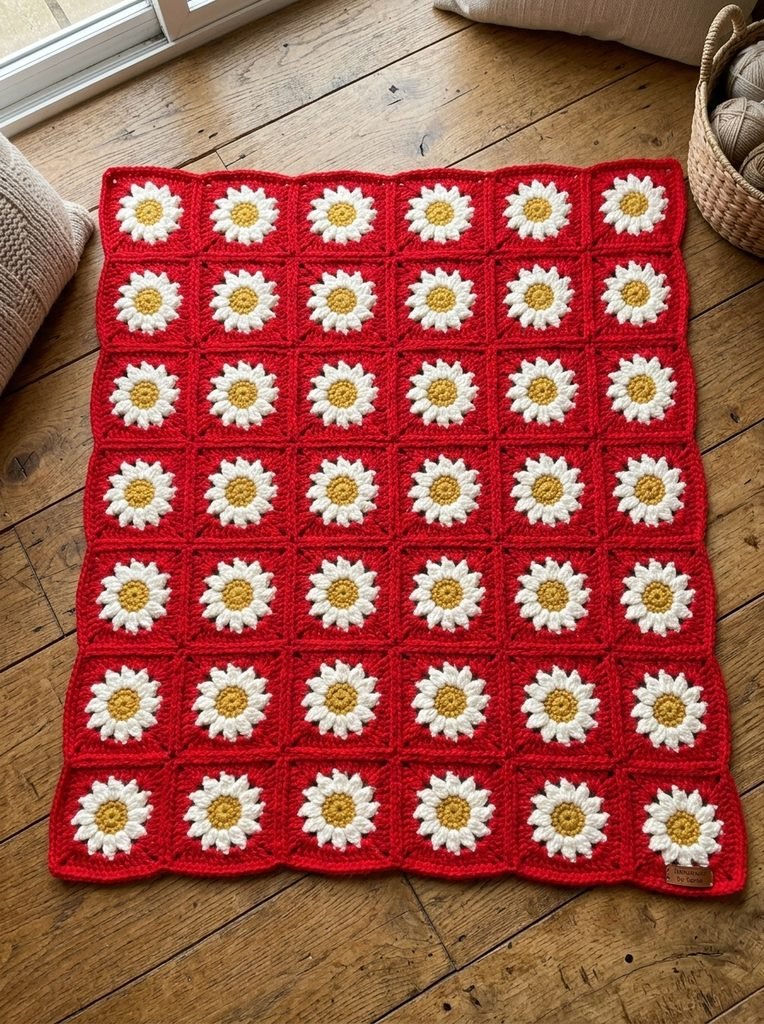
The finished blanket is roughly 45 × 52 in. (114 × 132 cm), made from 42 squares laid out 6 across and 7 down. You only ever have to learn one square, which makes this a friendly first blanket.
Materials for This Granny Square Crochet Pattern
Yarn: Lion Brand Hue + Me (bulky, Category 5)
- A, Agave: 7 skeins, about 820 g / 900 yds (background and frame)
- B, Salt: 3 skeins, about 284 g / 311 yds (petals)
- C, Mustard: 1 skein, about 42 g / 46 yds (centers)
Hooks: 8 mm (L-11) for the squares and border rnd 1. 10 mm (N/P-15) for the slip stitch border.
Other: locking stitch markers, bent-tip tapestry needle, steamer (optional, for blocking)
Gauge: one square = 7 × 7 in. (18 × 18 cm)
Resizing: each square uses about 16 g / 17.5 yds of A, 6.75 g / 7.4 yds of B, and 1 g / 1.1 yds of C. Do the math for your own square count.
Notes Before You Start
- Color changes by round. C is Rounds 1–2, B is Round 3, A is Rounds 4–5.
- Crochet over your tails as you go when you can. Weave the leftovers in the opposite direction so they don’t work their way out after a wash.
- The border is where people go wrong. Keep your slip stitches loose, looser than feels natural. Tight ones pull the edge in and the whole blanket starts to bow.
- Your first square will probably look off. Mine did. That’s fine, and by square four or five your hands know what to do.
Abbreviations (US Terms)
- ch = chain
- sl st = slip stitch
- sc = single crochet
- hdc = half double crochet
- dc = double crochet
- st(s) = stitch(es)
- sp = space
- MR = magic ring
- BLO = back loop only
- FLO = front loop only
- RS / WS = right side / wrong side
- beg cl = beginning cluster
- cl = cluster
- esc = extended single crochet
Special Stitches
MR: Make a loop with the tail lying under the working yarn. Pull a loop through with your hook, then ch 1 to lock it. Work your first round into the ring and pull the tail to close the center.
Beg cl: Ch 2. In the same st, yo, insert hook, yo, pull up a loop, yo, pull through 2 loops; repeat once more. Yo and pull through all 3 loops on the hook.
Cl: Yo, insert hook into the st, yo, pull up a loop, yo, pull through 2 loops; repeat 4 times total in the same st. Yo and pull through all 4 loops on the hook.
Esc: Insert hook, yo, pull up a loop. Stretch the loop up to match the height of the neighboring sts. Yo, pull through both loops.
Daisy Granny Square Crochet Pattern (Make 42)
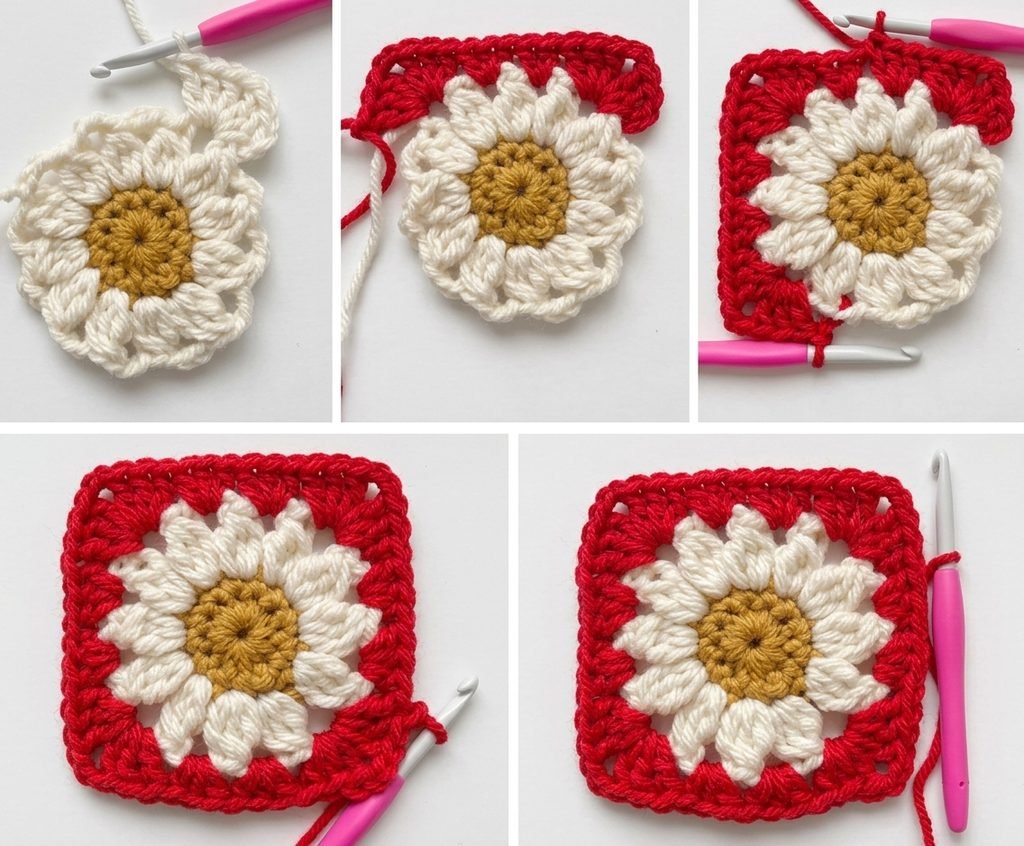
Rnd 1: With C, make a MR. 12 sc in the ring. Sl st to first sc to join. (12 sts)
Rnd 2: Ch 1, sc in same st. Sc in each st around. Sl st to first sc to join. Fasten off. (12 sts)
Rnd 3: Join B with a sl st in any sc.
- Beg cl in the same st.
- Ch 3.
- Cl in next sc, ch 3.
- Repeat step 3 around.
- Sl st to top of beg cl. Fasten off.
(12 cl, 12 ch-3 sps)
Rnd 4: Join A with a sl st in any ch-3 sp.
- Ch 3 (counts as dc). In same sp: 2 dc, ch 2, 3 dc. First corner made.
- 3 hdc in each of next 2 ch-3 sps.
- In next ch-3 sp: 3 dc, ch 2, 3 dc (corner).
- 3 hdc in each of next 2 ch-3 sps.
- Repeat steps 3–4 twice more.
- Sl st to 3rd ch of beg ch 3.
(48 sts, 4 ch-2 corner sps)
Rnd 5:
- Ch 3 (counts as dc), dc in next st.
- Skip 1 st.
- In corner ch-2 sp: 2 dc, ch 2, 2 dc.
- Skip 1 st.
- Dc across until 1 st before next corner, skip that st.
- Corner: 2 dc, ch 2, 2 dc.
- Repeat steps 4–6 twice more.
- Skip 1 st, dc in each of last 8 sts. Sl st to top of beg ch 3. Fasten off.
(56 sts, 4 ch-2 corner sps)
That’s one finished square. Repeat it 41 more times. Forty-two sounds like a lot, but it adds up fast. Make three in an evening and you’re done in about two weeks, or make one a night and you’ll have a blanket in six weeks, almost by accident.
Laying Out the Blanket
Put all 42 squares on the floor or your bed and build a rectangle, 6 wide by 7 long. Shuffle until the colors look right to you. Moving squares now costs you a minute. Moving them after they’re joined costs you a night of unpicking.
Joining the Squares
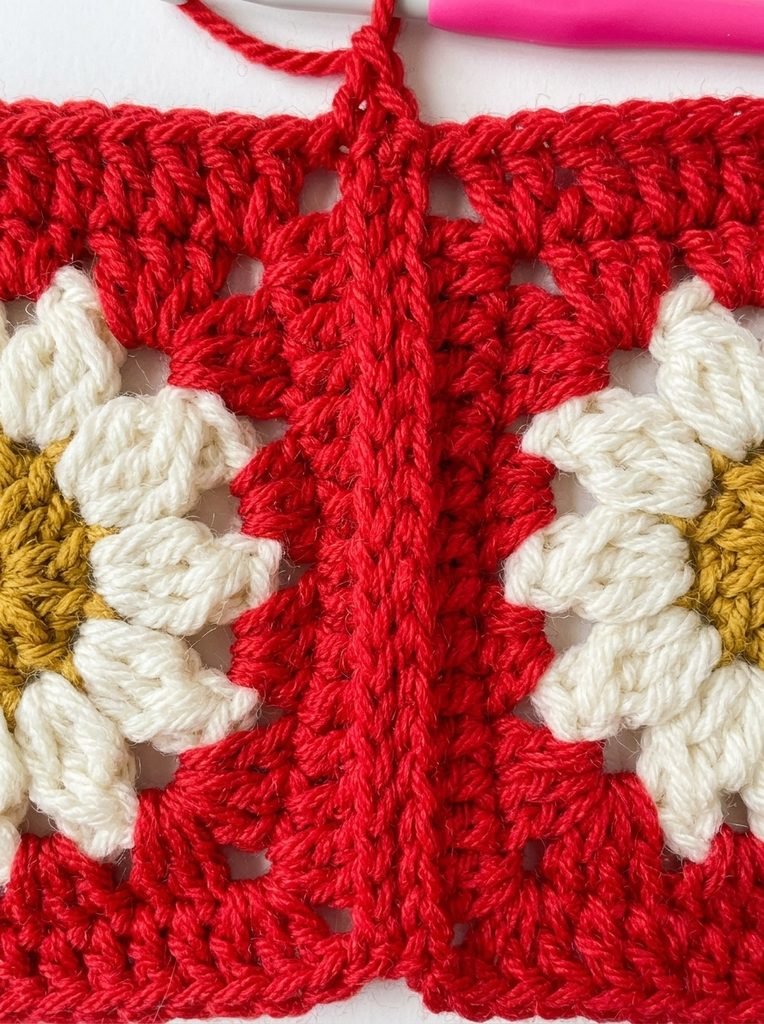
Three options. Pick the one you like.
Slip stitch, WS. Lay squares WS up. Sl st through FLO. You get a slightly raised seam on the back.
Slip stitch, RS. Lay squares RS up. Sl st through BLO. The seams show as raised lines on the front. Some people love that look, and I’m not one of them, but it’s your blanket.
Whip stitch. Flattest join, and my pick.
- Cut yarn lengths of about 75–80 in. (190–203 cm).
- Lay squares WS up.
- Sew the vertical columns first.
- Then sew the rows across.
- Go through FLO only. The unused back loops sit on the front and make a tiny frame around each square.
- Knot each seam firmly and leave long tails.
You can crochet over some of the tails in border rnd 1. Weave the rest in the opposite direction.
Blanket Border
RS facing you throughout.
Rnd 1 (8 mm hook):
- Find any corner ch-2 sp on the outer edge.
- Make a slip knot, insert hook into the BLO of the left ch of that corner, pull the knot through.
- Ch 1 (doesn’t count as a st), sc in same BLO.
- Sc in BLO around.
- Where two squares meet there’s a small dip. Work an esc there so the edge stays even.
- At each corner: sc in BLO of first ch, ch 2, sc in BLO of second ch.
- At the final corner: sc in BLO of last ch, ch 2, sl st to first sc.
Rnds 2–5 (10 mm hook), slip stitch border: loose tension, remember.
Rnd 2: Ch 1, sl st in same st. Sl st in BLO along each side. At each corner: ch 2, skip 2 chs. At last corner: ch 2, skip 2 chs, sl st to first st.
Rnd 3: Repeat Rnd 2.
Rnd 4: Same as Rnd 2, but ch 3 at each corner (still skipping 2 chs).
Rnd 5: Same as Rnd 4, but skip 3 chs instead of 2.
Fasten off and weave in your ends. Steam lightly if the edges want to curl.
Plain edge instead? Stay on the 8 mm hook after Rnd 1 and keep working sc rounds with the same corner method. Add as many as you like.
Color Ideas for Your Granny Square Crochet Pattern
Treat my palette as a starting point. The instructions don’t change whichever colors you pick.
- Scrap version: a different background on every square, using whatever is in your stash.
- Bakery pink: same C and B, but Rose Water instead of Agave. It’s a lot warmer.
- Your own trio: pick three colors you like together and go from there.
About the Design
This started as a daisy motif for a small, lightweight bag. I reworked it for bulky yarn, and the exposed loops along the seams give the finished blanket a faint quilted look. That’s how it became the granny square crochet pattern you’re reading now.
Go Make One Square
If you’ve been putting off crochet, this is a low-risk place to start. You need one hook, a few skeins, and a single evening for your first flower. Even if that first square looks a little crooked, you’ll want to make the second. A good granny square crochet pattern does that to people.
Video Tutorial
https://www.youtube.com/watch?v=kBD-EM7M9uk
Check Other Tutorials –> https://crochetpattern.us/crochet-blanket-pattern/