Welcome to this festive holiday tutorial where I will teach you how to make these adorable, standalone crochet ombré Christmas trees. These tabletop holiday trees feature layers of textured branch tiers that curl upward, giving the finished project the look of a snowy winter evergreen forest. They look incredible clustered on a mantel, placed on a holiday dinner table, or given as charming handmade stocking stuffers.
This post is based on the wonderful video tutorial by Repeat Crafter Me, linked below. Although the tiered branch ridges might look like complicated bobble stitches at first glance, they are remarkably simple to crochet. They are created using basic double crochets worked in the front loops only, which naturally flip upward while you continue shaping the tree cone in the back loops. In this guide, you will find the complete round-by-round written pattern, helpful photos, and tips to ensure your trees stand proud and flat.
Table of Contents
- What Will I Learn?
- Materials and Tools
- Pattern Notes
- Terms and Abbreviations
- The Written Pattern
- Video Tutorial
- Tips and Common Mistakes
- Make More / Related Patterns
- Frequently Asked Questions
- Sharing Your Make
What Will I Learn?
Crocheting these ombré Christmas trees is a rewarding project for beginners and seasoned makers alike. By following this pattern, you will learn how to:
- Start a three-dimensional cone shape neatly from the tip using an adjustable magic ring.
- Separate front loops and back loops to work textured surface branches while maintaining the structural tree cone.
- Create faux-bobble branch ridges using simple double crochet pairs and slip stitches.
- Work balanced increase and decrease rounds in continuous spiral or joined rounds.
- Stuff a 3D amigurumi style project firmly with polyester fiberfill to create a flat, stable standing base.
Materials and Tools
Below is the list of supplies I used to create these tabletop Christmas trees. Feel free to adapt yarn colors to match your home holiday decor.
- Yarn: Medium worsted weight yarn (category 4). I used Red Heart Super Saver Ombré in the color Green Apple. This yarn transitions smoothly between deep forest green, vibrant grass green, and soft sage, giving each tree its own unique gradient without having to switch skeins. You can also use any solid worsted yarn or sparkle yarn.
- Crochet Hook: Size H-8 / 5.0 mm crochet hook. This hook size provides dense stitches so the polyester stuffing does not peek through the branches.
- Stuffing: Poly-fil polyester fiberfill stuffing.
- Stitch Marker: Essential for keeping track of the first stitch of each round.
- Tapestry Needle: For weaving in your beginning tail and closing the bottom disc.
- Scissors: For cutting yarn.
Yarn Substitution Tip: If you prefer smaller miniature trees, you can use a DK weight (#3) cotton yarn paired with a 3.5 mm hook. For larger holiday centerpieces, chunky bulky yarn (#5) with a 6.5 mm hook works wonderfully.
Pattern Notes
- Crochet Terms: This pattern is written in standard US crochet terms.
- Construction: The tree is worked from the top down. You will work in rounds, alternating between front loop only (FLO) branch ridge rounds and back loop only (BLO) structural body rounds.
- Branch Ridges: The branch rounds are worked into the front loops only using [2 dc in next st, sl st in next st]. Because double crochets are taller than single crochets, they naturally curl and flip upward to resemble boughs.
- Body Rounds: When continuing the tree cone after a branch round, you will insert your hook into the unworked back loops directly behind the branch round.
- Joining Rounds: Each round joins with a slip stitch to the first stitch of the round, followed by a chain 1. The chain 1 does not count as a stitch throughout.
- Stuffing: Stuff the tree gradually from the top down as you approach the final decrease rounds. Do not overstuff to the point of stretching stitches, but pack it firmly enough so the bottom remains flat when standing.
Terms and Abbreviations
- ch: Chain
- st(s): Stitch(es)
- sl st: Slip stitch
- sc: Single crochet
- dc: Double crochet
- sc2tog: Single crochet two stitches together (decrease)
- FLO: Front loop only
- BLO: Back loop only
- MR: Magic ring
The Written Pattern
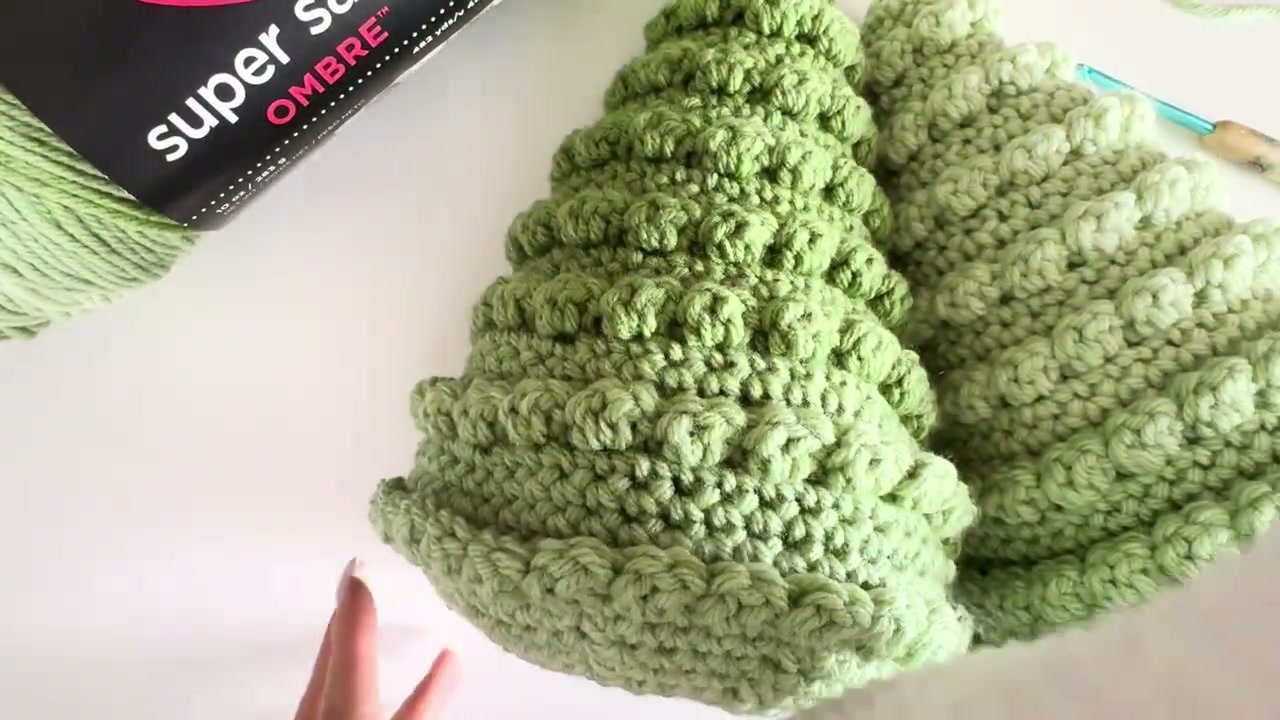
Tree Tip and Upper Shaping
Round 1
Make a magic ring. Work 6 sc into the magic ring. Pull the tail firmly to close the center hole. Sl st to the first sc to join, ch 1. (6 sc)

Round 2
*2 sc in the first st, 1 sc in the next st.* Repeat from * to * around. Sl st to join, ch 1. (9 sc)
Round 3
Work 1 sc in each st around. Sl st to join, ch 1. (9 sc)
Round 4
*2 sc in the first st, 1 sc in each of the next 2 sts.* Repeat from * to * around. Sl st to join, ch 1. (12 sc)
Round 5
Work 1 sc in each st around. Sl st to join, ch 1. (12 sc)
Branch Tier 1 (Round 6)
Working in the front loops only (FLO): *Work 2 dc in the first front loop, then sl st into the next front loop.* Repeat from * to * around. Sl st to join, ch 1. (6 branch clusters formed)

Tier 2 Body and Branches (Rounds 7 – 11)
Round 7
Reach your hook behind the branch ridge just made and work into the unworked back loops only (BLO): *2 sc in the first back loop, 1 sc in each of the next 3 back loops.* Repeat from * to * around. Sl st to join, ch 1. (15 sc)

Round 8
Working through both loops: Work 1 sc in each st around. Sl st to join, ch 1. (15 sc)
Round 9
Working through both loops: *2 sc in the first st, 1 sc in each of the next 4 sts.* Repeat from * to * around. Sl st to join, ch 1. (18 sc)
Round 10
Work 1 sc in each st around. Sl st to join, ch 1. (18 sc)
Round 11 (Branch Tier 2)
Working in FLO: *2 dc in the first front loop, sl st in the next front loop.* Repeat from * to * around. Sl st to join, ch 1. (9 branch clusters)
Tier 3 Body and Branches (Rounds 12 – 16)
Round 12
Working in BLO: *2 sc in the first back loop, 1 sc in each of the next 5 back loops.* Repeat from * to * around. Sl st to join, ch 1. (21 sc)
Round 13
Working through both loops: Work 1 sc in each st around. Sl st to join, ch 1. (21 sc)
Round 14
Working through both loops: *2 sc in the first st, 1 sc in each of the next 6 sts.* Repeat from * to * around. Sl st to join, ch 1. (24 sc)
Round 15
Work 1 sc in each st around. Sl st to join, ch 1. (24 sc)
Round 16 (Branch Tier 3)
Working in FLO: *2 dc in the first front loop, sl st in the next front loop.* Repeat from * to * around. Sl st to join, ch 1. (12 branch clusters)

Tiers 4 Through 8 (Rounds 17 – 41)
Continue following the established sequence of expansion. For each subsequent tier, the stitch count increases by 3 stitches on the increase rounds:
- Round 17 (BLO): *2 sc in first back loop, 1 sc in next 7 back loops* around. (27 sc)
- Round 18: 1 sc in each st around. (27 sc)
- Round 19: *2 sc in first st, 1 sc in next 8 sts* around. (30 sc)
- Round 20: 1 sc in each st around. (30 sc)
- Round 21 (Branch Tier 4 – FLO): *2 dc in first front loop, sl st in next front loop* around. (15 branch clusters)
- Rounds 22 – 26 (Tier 5): Follow increase sequence up to 36 sc, ending with Branch Tier 5.
- Rounds 27 – 31 (Tier 6): Follow increase sequence up to 42 sc, ending with Branch Tier 6.
- Rounds 32 – 36 (Tier 7): Follow increase sequence up to 48 sc, ending with Branch Tier 7.
- Rounds 37 – 41 (Tier 8): Follow increase sequence up to 54 sc, ending with Branch Tier 8 in FLO.
Stuffing the Tree
Once you complete Round 41 (the final branch tier), begin filling your tree with polyester fiberfill stuffing. Start by gently pushing stuffing up into the slender tip of the cone, then add firm, even handfuls to fill out the body. Leave a little space at the bottom opening so the stuffing does not get caught in your stitches during the base closure.

Closing the Bottom Base (Rounds 42 – 47)
Round 42
Working in the unworked BLO behind Round 41: Work 1 sc in each back loop around without any increases. Sl st to join, ch 1. (54 sc)
Round 43 (Decrease Round)
Working through both loops: *Sc2tog over the first 2 sts, 1 sc in each of the next 4 sts.* Repeat from * to * around. Sl st to join, ch 1. (45 sc)
Round 44
Work 1 sc in each st around. Sl st to join, ch 1. (45 sc)
Round 45 (Decrease Round)
*Sc2tog over the first 2 sts, 1 sc in each of the next 3 sts.* Repeat from * to * around. Sl st to join, ch 1. (36 sc)
Round 46 (Decrease Round)
*Sc2tog over the first 2 sts, 1 sc in each of the next 2 sts.* Repeat from * to * around. Sl st to join, ch 1. (27 sc)
Final Stuffing Check: Pause and add any final bits of stuffing needed into the base. Ensure the stuffing is distributed evenly across the diameter so the bottom will remain flat and steady.
Round 47 and Final Closure
*Sc2tog over the first 2 sts, 1 sc in the next st.* Repeat around. (18 sc). In the final round, work sc2tog continuously around until about 6 to 9 stitches remain. Fasten off, leaving an 8-inch yarn tail. Thread the tail onto your tapestry needle, weave through the front loops of the remaining stitches, pull tight to cinch the hole closed, and weave in your end securely.
Video Tutorial
You can follow the full video tutorial below to see every technique demonstrated up close, from the front loop ridges to closing the base:
Use the timestamps throughout the written pattern above to jump to corresponding sections of the video.
Tips and Common Mistakes
- Identifying the Back Loops: When transitioning from a branch round to the next body round, look directly behind the front loops you just worked into. The unworked back horizontal bar is waiting right behind the double crochet clusters.
- Do Not Over-Puff the Base: If you over-stuff the very bottom of the tree, the base will bow outward and wobble rather than sitting flat. Ensure the stuffing is firm against the side walls while pressing the base flat with your palms.
- Let the Ombré Shine: When using gradient yarn like Red Heart Super Saver Ombré, let the natural color progression work its magic. Each tree will showcase a distinct gradient transition from tip to trunk.
- Optional Embellishments: Feel free to sew small colorful seed beads or wooden star buttons onto the tips of the branch ridges for miniature ornaments.
Make More / Related Patterns
Looking for more festive crochet ideas? You will love these coordinating holiday patterns:
Crochet Christmas Tree Tutorial –> https://crochetpattern.us/crochet-christmas-tree/
Crochet Angel Keychain Pattern –> https://crochetpattern.us/crochet-angel-keychain/
Frequently Asked Questions
How tall does the finished ombré tree measure?
Using worsted weight yarn and a 5.0 mm hook, the completed tree stands approximately 8 to 9 inches tall from the tip down to the base.
Can I make smaller or taller trees?
Yes, you can easily adjust the height. To make a smaller tree, stop after 5 or 6 branch tiers and proceed straight to the decrease base rounds. To make a taller tree, continue the increase sequence for additional tiers before closing the bottom.
Do I need cardboard or a plastic disc for the base?
No extra inserts are required. As long as you maintain consistent tension on the decrease rounds and avoid overstuffing the center of the base, the crocheted bottom will naturally sit flat on any surface.
Sharing Your Make
I would love to see your handmade holiday grove! Please share photos of your completed ombré Christmas trees in the comments below or tag me on Instagram with your holiday decor. Happy crocheting, Meryem.